The last two posts kind of went up in a rush.
I logged in to write
this post, actually, and saw that my AB 2014 post was still languishing in the "Drafts" folder. So I grabbed a cup of coffee and panicked. Effectively.
That was this morning. Since then, deep breaths have been taken and the coffee has been replaced with green tea. Which means I can finally get on with writing what I meant to post all along -- how I built my 5-foot-long gun for Zarya.
You might know of her. She's this Russian body builder from the game Overwatch. If you do, you are one step ahead of me when I started conceiving this project. A good friend (
https://alucydoes.wordpress.com/) wanted to cosplay "Casual Overwatch" for DragonCon this year and roped me into it. I never played the game. Still, I went to pick a character and fell in love with Zarya's prop, hair, and badass attitude. I had to see what I could make of her.
So, in order, this is how I put together Zarya.
The Gun
Qualifications: huge and lightweight
Tools: screenshots for base sketching, Shopbot CNC Router, lasercutter, hand tools, lots of paint
 |
| The Gun. My reference for everything. |
 |
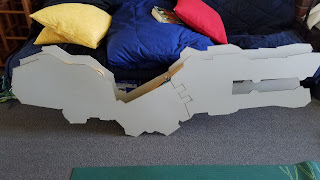
| Divided the gun into two layers -- a base layer of effectively cardboard, lasercut to the scaled specifications of a reference, and an overlapping layer of foam, cut on a ShopBot. The base layer became black and the foam white. | | | | | | | | |
|
 |
| I needed some way to hold a very light and possibly unwieldy gun. Given that cardboard is not the most stable of materials when cut into long thin rectangular-like things, I opted not to use the actual handhold configuration of the in-game gun. Instead, I picked up two of these cardboard briefcases to sandwich between the two sides of the gun and serve as handholds. This was doubly useful because it turned out that the lasercutter I was using was only big enough for half of the gun at a time (see pic above). The briefcases gave me something solid to anchor the two sides on. |
 |
| And so I did. The base layer in this photo has just been Elmer's glued onto the two briefcases (throwback to elementary school. Man.) The books are positioned above each briefcase and are being used to weigh down the parts until they set. All in all, this took about a day -- I was very cautious to make sure it set properly. |
 |
| The final, glued result. Now it can stand on its own!! |
 |
| The next step was to paint the overlayer of foam white. Here, I learn that foam needs to be coated before it can be spraypainted...or even primed. If one does not seal the foam, it starts to melt. Luckily, this was a test piece. |
 |
| I spend a few hours one weekend afternoon sealing all of my foam pieces. Two coats of Mod Podge was about right. I have the sneaky suspicion I could have used Elmer's Glue to the same effect. |
 |
| After the Mod Podge, I took the foam outside (in the wind...yeesh) to give it the first coat of paint. I decided at this point that the primer was unnecessary. The paint looked just fine. |
 |
| The second coat of paint was applied in a loading dock. Spray-painting in the wind is, as I suspected, not fun. |
 |
| Before I could mount the foam, I needed to paint the base. I also needed to make sure the gun looked like a solid object. I toyed briefly with the idea of filling the interstitial space between the two sides with foam, but then decided on the infinitely easier path of buying really thick masking tape and using it to create a shell between the two side of the gun. For this paint job, then, I needed to use primer to get a more even coat. I was also, thankfully, painting everything black, which made the use of masking tape much less obvious. |
 |
| I did fill one section with foam...the gold piece at the front of the gun is another instance of sealed and painted foam. That was not cut to any particular size -- whatever I had left over from the ShopBot that roughly fit the space was about what I needed. The foam inside and all of the now-white decals were connected to the base via spray adhesive. Fast, effective, but damn toxic stuff to breath in. |
|
All of the little details on the foam decals were added by hand using acrylic paint and foam brushes.
And voila! My gun is finished!
The Hair
Qualifications: Pink and short
Tools: Bleach, hair dye, and a very patient friend
 |
| I think, at this point, the results speak for themselves. |
The Badass Look
Qualifications: "Casual"
Tools: Amazon, Under Armour, and things I normally like to work out in.
Photographer: http://thevariableconstant.blogspot.com/
 |
| Hello thar |
 |
| Welcome to the Gun Show |
 |
| Guns and mood lighting. |
 |
| And, of course, no cosplay is complete without these lovely ladies. |


No comments:
Post a Comment