Saturday, November 5, 2016

Getting out the Big Gun(s)

The last two posts kind of went up in a rush.

I logged in to write this post, actually, and saw that my AB 2014 post was still languishing in the "Drafts" folder. So I grabbed a cup of coffee and panicked. Effectively.

That was this morning. Since then, deep breaths have been taken and the coffee has been replaced with green tea. Which means I can finally get on with writing what I meant to post all along -- how I built my 5-foot-long gun for Zarya.


You might know of her. She's this Russian body builder from the game Overwatch. If you do, you are one step ahead of me when I started conceiving this project. A good friend (https://alucydoes.wordpress.com/) wanted to cosplay "Casual Overwatch" for DragonCon this year and roped me into it. I never played the game. Still, I went to pick a character and fell in love with Zarya's prop, hair, and badass attitude. I had to see what I could make of her.

So, in order, this is how I put together Zarya.

The Gun

Qualifications: huge and lightweight

Tools: screenshots for base sketching, Shopbot CNC Router, lasercutter, hand tools, lots of paint

The Gun. My reference for everything.

Divided the gun into two layers -- a base layer of effectively cardboard, lasercut to the scaled specifications of a reference, and an overlapping layer of foam, cut on a ShopBot. The base layer became black and the foam white.


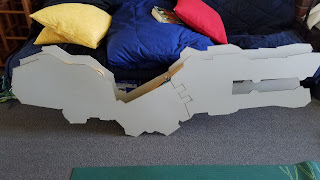
I needed some way to hold a very light and possibly unwieldy gun. Given that cardboard is not the most stable of materials when cut into long thin rectangular-like things, I opted not to use the actual handhold configuration of the in-game gun. Instead, I picked up two of these cardboard briefcases to sandwich between the two sides of the gun and serve as handholds. This was doubly useful because it turned out that the lasercutter I was using was only big enough for half of the gun at a time (see pic above). The briefcases gave me something solid to anchor the two sides on.

And so I did. The base layer in this photo has just been Elmer's glued onto the two briefcases (throwback to elementary school. Man.) The books are positioned above each briefcase and are being used to weigh down the parts until they set. All in all, this took about a day -- I was very cautious to make sure it set properly.

The final, glued result. Now it can stand on its own!!

The next step was to paint the overlayer of foam white. Here, I learn that foam needs to be coated before it can be spraypainted...or even primed. If one does not seal the foam, it starts to melt. Luckily, this was a test piece.

I spend a few hours one weekend afternoon sealing all of my foam pieces. Two coats of Mod Podge was about right. I have the sneaky suspicion I could have used Elmer's Glue to the same effect.

After the Mod Podge, I took the foam outside (in the wind...yeesh) to give it the first coat of paint. I decided at this point that the primer was unnecessary. The paint looked just fine.

The second coat of paint was applied in a loading dock. Spray-painting in the wind is, as I suspected, not fun.

Before I could mount the foam, I needed to paint the base. I also needed to make sure the gun looked like a solid object. I toyed briefly with the idea of filling the interstitial space between the two sides with foam, but then decided on the infinitely easier path of buying really thick masking tape and using it to create a shell between the two side of the gun. For this paint job, then, I needed to use primer to get a more even coat. I was also, thankfully, painting everything black, which made the use of masking tape much less obvious.

I did fill one section with foam...the gold piece at the front of the gun is another instance of sealed and painted foam. That was not cut to any particular size -- whatever I had left over from the ShopBot that roughly fit the space was about what I needed. The foam inside and all of the now-white decals were connected to the base via spray adhesive. Fast, effective, but damn toxic stuff to breath in. 
All of the little details on the foam decals were added by hand using acrylic paint and foam brushes.

And voila! My gun is finished!

The Hair

Qualifications: Pink and short

Tools: Bleach, hair dye, and a very patient friend

I think, at this point, the results speak for themselves.

The Badass Look

Qualifications: "Casual"

Tools: Amazon, Under Armour, and things I normally like to work out in.

Photographer: http://thevariableconstant.blogspot.com/

Hello thar

Welcome to the Gun Show
Guns and mood lighting.
And, of course, no cosplay is complete without these lovely ladies.

Learning how to be Legit

Let's see if I can make this post mostly photos.

Because in 2016, I put together two cosplays -- each with only a minimal amount of Duct Tape (eep!)

The first taught me the value of sewing in a timely manner. The second was my foray into Damn Massive Props (DMP).

Let's begin with the sewing project -- a continuation of a previous cosplay, though you might notice a few key differences...

Weiss Schnee from RWBY

I kept the weapon from a few years ago (though I had to re-cut one of the hilt details after basically leaving the blade in a machine shop for two years...note to self, Adafruit has some damn good LED wires...the thing still lit up!!) so the challenge this year was a legit version of the Weiss outfit.

Legit because I was cosplaying with these lovely ladies, and I needed to make sure my outfit was worthy of their presence

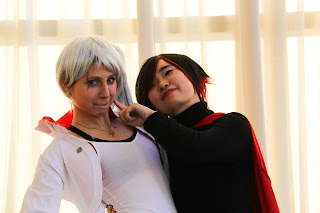
There ya go. The RWBY ladies in full force.
Luckily, the lovely lady cosplaying Blake also happened to have infinite patience with a sewing machine. And people learning how to properly use a sewing machine (haiiii).

Through many nights at her place listening to KPOP (BTS - Dope made many an appearance) I got this outfit finished.

True to form, it was not all from scratch. I certainly saw no need to sew a white camisole shirt when there were several available in most women's clothing stores. Instead, I focused on tailoring a few pieces to my character -- and my body.

If nothing else, I learn time and again that costumes you make for yourself actually fit you. Cosplay-wise, this is a huge benefit both for comfort and the overall look.

The jacket needed to be constructed by hand. It was kind of a bolero sweater, except it had a lot more structure. I began with an actual bolero (white), and ran it through its paces -- cut off sleeves and added my own, added a collar, inserted lining, sewed on some lace, and put in details like the tiny buttons.
Emblem on the back was painted on with a lasercut stencil

During this process, I discovered...the magic of fuseable fabric (for the collar), the wonders of an edge stitch on a sewing machine (for when hemming just seemed silly), better technique for hemming lace on curved edges (still working on it, but this time I was more patient), and the magic of fabric dip-dye (you need a large stock pot you do not mind losing forever, but the results kind of speak for themselves).

The skirt was far easier to make, since there was no lining involved and the overall shape is pretty simple. Again, fabric dip-dye was essential in getting the proper gradient of color (Weiss has a fade from blue to white). It was recommended to me at AB 2014 that I use airbrushing to achieve the gradient, but once 2015 rolled around I found out that...airbrushing is kinda expensive. And I am still a cheap cosplayer. So.

Maybe in the future, it will be a worthwhile investment, but for now...

Where is the duct tape, you ask? Look no further than the little pouch right there. All duct tape. And still incredibly functional. See? Still an engineer.

Boots were as simple as fabric covering and strategic sewing/sealing with duct tape. Again, stiffening fuseable fabric was a god-send for making this work. I actually used some boots I bought many years ago for a Mireille cosplay (Noir, for those 90's connoisseurs) as the base for Weiss's footwear.

I don't have the heart to take the boot covering off. Sorry, Mireille, but I don't think you are coming back.
This cosplay endeavor was punctuated by many trips to the fabric store, by weeknights at a sewing machine discovering the wonders of BTS, by time cracking up with these lovely ladies as we all learned how to correctly use said sewing machine, and a little bit of time in a machine shop to fix damage done to the aging (but functional!) blade. All it all, it showed the benefits of patience with doing things the right way in a sewing context. Also the benefits of cosplaying with these wonderful ladies (https://alucydoes.wordpress.com/ http://cynaesthetics.blogspot.com/).

Oh, and the real benefits of a photographer. A cosplayer's best friend. See for yourself below!

We're going on an adventure!!

Lighting. Such lighting.

D'awwwwwwww

Ruby gets it. Weiss needs a bit more time.

Be on the lookout for RWBY Season 4 outfits -- hopefully debuting at Anime Boston 2017!!

Venture into the Land of the Sewing Machine

From the archives of the Never Quite Published On Time
 
Anime Boston 2015.

Just ended. Yesterday. And I still feel like I need to fall over and sleep for a week.

I didn't do very much of that the week leading up to AB'15, as tends to happen, because cosplay. Specifically, this:


And this:


Guess which one of these was the more difficult to throw together? Not, alas, the more polished one. That is what happens when other people sew my clothes for me (and then ship these clothes to me via a combination of Amazon, Ebay, and so on). The blue one is what happens when I sew my own clothes, which brings me to this installment of Duct Taped Cosplay: in which I attempt to duct tape as little as possible (for once).

Miki Sayaka is an excellent character, both in design and in personality. For those of you who have not seen Madoka Magica, I would suggest you stop reading this right now and go satisfy your curiosity. It can be best described as "dark magic girl", but honestly that comes nowhere close to describing the full impact of this series. If you, like me, are a bit dissatisfied with how most magic girl series handle their character development, then you will love Madoka.

That aside, all you need to know for this post is that Sayaka is a bad-ass blue sword-wielding magic girl who I really wanted to cosplay appropriately. That meant hiding my tape for a week and instead trying to learn how to make lasting costume pieces via sewing. [Insert dramatic music]

The costume was composed of five pieces, each one I dealt with separately before putting them all together the night of the con. I will use the picture above for reference, because (alas), I fail at taking photos of things in progress. I will get better. I swear. But here was the general set-up:

Sewing machine, fabric, scissors, and (of course) duct tape


Piece #1: Cape

I had a vague idea of where to begin with this one. A cape, in my mind, was basically a collar sewn onto a large piece of fabric. The collar was relatively easy to figure out -- cut two rectangular squares of fabric to the diameter and height of my neck, round the edges meant to be at the front of the collar, trim the "outer" rectangle with gold bias tape (double-sided works best, for sure) and then connect the two rectangles with a healthy dose of stiffening fabric in between (iron on! What a wonderful invention).

This piece, in short, required judicious measurements of my neck and then some white fabric, gold bias tape, sewing machine (for the bias tape), stiffening fabric, an iron, and some fasteners hand sewn to the front of the collar as a clasp. Not too complicated, and once I knew where I was heading it took the better part of an hour.

The larger chunk of the cape was a bit harder to think about -- I kept trying to find a nice geometric shape with sharp corners that could mold to the collar and my neckline, but finally I gave up after a few days of mulling over the problem. The real solution, to get the shape of the cape right as it hung over me, was to cut a trapezoidal shape (larger at the bottom) then have a friend trace the top around the top of my shoulder places. And cut. And sew to the collar.

Voila, the cape is done! ...minus some trim for the actual cape bit. Which. I didn't do. Not yet. (It was finneeeee...)

Piece #2: The Top

This was the first part of the cosplay I finished, mainly because I had a strong concept going into the sewing process. I admit that I did this the cheating way...the actual character Sayaka appears to have some sort of armored chest plate, but I decided instead to mold fabric over a strapless bra. The basic idea was to cut the fabric into shape and sew behind (occasionally to) the bra.

Then attach the white part just below, and hem everything with lace. Hemming curves, as it turns out, is kinda hard. Definitely a technique I will acquire over time.

One of these days I will dive into the world of Worbla. I just need to get over that one last activation energy hump.

Piece #3: The Skirt

I could have made my own paneled skirt (and indeed, a friend cosplaying Homura at the time did just that). But my habit of throwing everything together the night before meant that it was much more expedient for me to alter an already existing schoolgirl skirt to match Sayaka's outfit.

It is harder than you'd think to find a simple, navy pleated skirt online. I might have been looking in all the wrong places (I must have been looking in all the wrong places, come to think of it), but honestly the time I spent searching for such a mundane item could have been better spent actually making it. Lessons for the future.

The details on the skirt were all attached via a belt -- each one of the blue panels, and then the means to hold everything together. As you can probably guess, the skirt itself was sliced generously to alter it for the character. I did not actually end up hemming that bit. I probably should have. Check -- I definitely should have. The costume would have lasted more than a day.


 Piece #4-5: The Gloves and Leggings

Pieces of tights, cut to spec. 'Nuff said.

Lessons Learned

Sewing everything the night before is not, alas, a good idea. Or even a few nights before. As I learned the next year (AB 2016!!), the time it takes to sew something right and hem all the things actually pays off.

I rather like how the blade came out, either way (lasercut and spraypaint, for those who are interested).

But, the best costume of AB 2015 definitely turned out to be...

Psycho Pass

Sunday, April 13, 2014

That Thing I Wore

A couple of weeks ago, I posted the incredibly long description of how I made my RWBY prop for Anime Boston 2014. I used words like 'rapid prototyping' and '3D printing' to make it sound all fancy and like I had a clue about what I was doing.

Well I didn't, at least at first, but I got a better handle on the techniques used to put my Myrtenaster together (and keep it together) as the build progressed. For my taste, however, in that last post there was not enough usage of the term 'duct tape'. It failed to clearly convey how much of a slap-dash process my cosplay builds usually are. I seek to remedy that by relaying the tale of how I got the costume itself together.

Alas, I did not take many (read: any) pictures of the costume in progress. So this will be a short and sweet post about the dangers of fabric spray-paint and the wonders of last minute shopping trips to the guys section of a clothing store. There will be pictures, there will be reasonable description, and I will aim to keep you amused.

Big picture, because it's the detail that matters

The costume was constructed from a base of white pants and a white tailored jacket (for less that $50 total on a last-minute shopping trip to the nearest mall-equivalent) and a pair of white golf shoes (fortuitously found fro $16 at a local thrift store). This is pretty standard for most of my cosplays: I try and find base pieces for relatively cheap at local stores and then alter them as needed.

The alterations to this costume are fairly evident in the above photo. I cut some tails from white fabric and duct taped them to the back of the jacket. I also hemmed these fabric pieces with white duct tape, which gave the tails structure and a clean cut. It is a trick I have learned for cutting fabric -- if you put duct tape behind the areas you want to cut through, any scissor you care to use will make a straight line. It is a really useful tool for those of us who do not have fabric scissors.

I then spray-painted several select areas blue in the style of Weiss (the girl version). The fabric spray paint was a bit of an experiment for this particular cosplay. I found it online and thought it would be useful to try -- I had not learned yet that airbrushed paint could do the job even better. Instead, I learned that fabric spray paint can be very difficult to handle. It is prone to bleeding and to uneven application.

However, if you buy the upholstering spray-paint, most of the application problems disappear. The company accidentally sent me blue upholstering paint in my second order from them, and it was a godsend for this cosplay. The color became more saturated than I intended, but it was also much smoother and professional-looking.

The details on the back of the jacket were done with acrylic paint and a paintbrush. I attempted to use a lasercut stencil at first, but the spray-paint did not want to comply with staying inside the stencil lines. It was much easier to just paint the damn thing on.

And that is about it! Once the jacket was altered (I sewed the sides a bit to get rid of some of the girly structure to the waist) and painted, the costume was ready to go.

It held up pretty well throughout the con. My only real issue by the end of the day were the shoes (note: golf shoes are damn uncomfortable. Never, ever wear them without incredibly thick socks to match).

And voila. The final product. It was much fun.

The male cadre from a parellel RWBY universe dispatches the original Ruby Rose. There's some symbolism in this, I swear.


Dude Blake and Dude Weiss duke it out.


Wednesday, April 2, 2014

In Which I Did Not Screw It Up. Mostly.

Anime Boston 2014 - Genderbend Weiss Schnee from RWBY

tl:dr It's damn freeing to think of something and then bring it into existence via blood, sweat, tears, sleepless nights, and really good friends. 
There are definitely some philosophical implications in our ability as humans to turn the intangible into the tangible. I find it kind of sad that most people these days (and indeed, myself until this winter) don't have the automatic thought process "I need something?" "Sweet, let's build it"

Allow me to orient you, dear reader, a bit before we get into the nitty-gritty of the build:


The inspirations behind this cosplay were the wonderful trailers which preceded the actual RWBY series by a couple of months. Before the series proper debuted, these enigmatic accounts of four epic battles caught my attention. The weapons wielded by the main characters were creative, detailed, and above all not completely bound by anime physics.

In other words, I had a good shot of being able to translate them to the real world.

I almost immediately identified with Weiss Schnee, the character depicted in the 'White' trailer. She was solitary, blue-eyed, and above all a left-handed fencer. Kind of like me. For my first cosplay prop build, her weapon Myrtenaster seemed like a perfect fit.

Who doesn't want to cosplay a battle-scared heroine with a kick-ass rapier?
This would be my first serious build for a cosplay, and my first time using rapid prototyping techniques to make an anime weapon. It went much more smoothly than I anticipated, largely because I spent most of my time designing both the weapon and the build strategy. Of course, this is only the first iteration of both the character and her weapon. But it gave me a lot of material to move forward and create an even better, more realistic Myrtenaster.

And now the nitty-gritty details of the build.


Design


I was trying to build

This thing. Right here.

You might notice that it is a metal rapier which, if translated faithfully to the real world, would be an excellent sparring weapon. Unfortunately, my first stop as Weiss was Anime Boston 2014, which wisely restricts the convention proper to non-lethal props.

As a result, I decided to focus on the magical aspect of the weapon rather than the sharp aspect. This relieved me of the need to find a working forge, but also meant that on first approximation I'd be effectively copying the designs of much better cosplay artists than myself. Not hugely exciting.

Unless I made my blade glow. Now that would be interesting.

In addition to being my first prop build, this was also the first time I ever seriously used a CAD program to create an object. I had recently discovered access to rapid prototyping techniques such as 3D printing and laser cutting and decided that the most effective way to use both was to CAD my object in a suitable program.

With this in mind, a design took shape in my head.

I would use EL Wire to make the blade glow. I'd need a seriously long string of wire doubled over inside the blade, and a battery pack inside the hilt to control the light.

The blade would be a thin, rigid plastic tube which would be spraypainted silver and etched in some artsy design similar to Weiss's final 'white' attack in the trailer. The EL Wire would show through these etchings.

The hilt would be a 3D printed barrel to resolve the gemstones and made hollow to hide the battery pack. The supports for the hilt would be lasercut to etch the details.

The grip would be an extension of the rigid plastic tube, taped and likewise spray painted.

I did not immediately think about the pommel or tip of the blade, kind of figuring that I'd work those out as I went along. But the main components of the blade were set before I even opened a CAD file. It was in my head. All I needed to do was bring it to life.

Build

The CAD models (below) of the blade chamber were 3D printed using some clear material that this guy -- etotheipiplusone.net -- provided and suggested. I had at least three iterations of this made (forgot to account for the battery pack in the first two).

Mmm, CAD models.
Mmmm, modified CAD models. Hole is for the square EL Wire battery pack.

There was a similar iterative process with the supports of the blade hilt. As you can see below, I did not design these for something to go in between them (for instance, say, a blade) the first time around. Moar CAD modifications!

3D designs turned to prototype blade chamber (white) and scrap wood hilt detail (brown). Both redone before the end.

Turned out that the hilt detail was easiest done as a simple vectorized image and thrown on the laser cutter from there. No CAD model required in the end! I used the reference below to trace over the etchings for the blade supports.

Hilt design detail, vectorized in AutoCAD, but had I access to Illustrator that would have been easier.
Final cut of hilt design, complete with etched detail

Close-up of the etchings. The wonders of ten extra minutes with CorelDraw.
Same deal with the emblem design. Laser cutters are life savers for details like this.
The plastic tube was chosen from a selection on McMaster -- I kind of guessed at what might be appropriate. That turned out surprisingly well -- I really should have put a bit more thought into my materials choice, but I was kind of going with a "this looks about right" approach.

Once I had all of the pieces either laser cut, 3D printed, or shipped from various online sources, I could toss everything together. My approach was incredibly simple in the end: hot glue whatever I could, and duct tape what I could not. The final version of the blade is almost exclusively held together by hot glue. If you have enough structural support built into the prop, this approach seems to work rather well.

Then it was just a matter of primer, spraypaint, and etching in the designs with a sharp object on the blade. The EL wire was wrapped inside the length of the plastic tube before anything was secured or painted, and in the right lighting conditions it shone through beautifully.

In all of its glory.

My first built took two weeks of thinking, CADing, planning, and acquiring all of the parts. Then it was a week of late nights waiting for spraypaint to dry, gluing things together, printing last-minute parts to cover holes I had not anticipated, and finally getting the thing looking relatively pretty (hellooo modeling clay). I was making a costume during that last week as well, which did not help my timeline any.

Look, it lights up! ...as apparently do my eyes. All sorts of weird lighting things happening here.

I am super happy with the result. But I know it can be better.

For a build that is meant to survive a couple of days at an anime convention, at most, my haphazard approach worked well. For anything more serious, however, my approach could have gotten me into some serious trouble. I will keep this in mind when I start on my fully metallic, and lighted, version of Myrtenaster. Onward to Dragon Con!


Sunday, March 30, 2014

First build, first post, long time coming

Anime Boston 2014 -  RWBY.

Genderbend Weiss Schnee AB 2014

Anime Boston 2013 -  Durarara!!


Izaya Orihara (center) AB 2013

Otakon 2012 -  Steins;Gate

Kurisu Makise (right) Otakon 2012

This is a small sampling of the cosplay I've put together since attending my first anime convention as Ty Lee in 2009 -- there are, to date, at least seven characters I've emulated to varying degrees of success at East Coast conventions. And they've all yielded a smattering of pictures, a bit of recognition from other con-goers, and good times with good friends.

So why would I write about it? Heck, why would you bother to read about my (ongoing) adventures with cosplay?

Maybe it's because you, like me, think of cosplay as a hobby. You like going to conventions (or want to try), you like anime (or any cartoon/video game in general, really), you like being around other fans and you are not afraid to wear something a little silly. But you don't spend months at a time on a single outfit. You don't have a dedicated sewing machine, or really a clue of how to properly sew something. You need a place to start figuring out how to dress up like that character you love, but you're a little pressed for time.

Join the club. This blog is called "Duct Tape Cosplay" because I revere the art of using duct tape to put together the last touches of a costume that I may have almost not-quite finished in time for the convention. I'm a beginner, possibly like you, and I like coming up with inventive ways to overcome my shortcomings in the more traditional cosplay arts.

In short, I'm an engineer at heart, and I am learning how to make better and better cosplays as time goes by because it is a lot of fun. I invite you to read about, and maybe learn a bit from, my continuing adventures in making whatever silly costumes and props I damn well please in whatever method strikes my fancy (and budget. And schedule) at the time.

These posts will probably be out of order. But, hell, everyone's got to start somewhere.

Credit for the photos usually goes to this guy: http://www.etotheipiplusone.net/

The lovely lady next to me in most of these photos can be found here: http://cynaesthetics.blogspot.com